
Get the taste of HTML5: Fifth and the latest major version of HTML
 Welcome!
Thanks for giving me the opportunity to help you with getting the taste of HTML5.
| Please avoid to assume it as a complete tutorial on HTML5. |
HTML5 Introduction
HTML5 is the fifth and latest major version of HTML which is a markup language used for structuring and presenting content on the Web. It was first released in public on 22 Jan, 2008 and then standardized in Oct 2014.
Its goals were to improve the language with support for the latest multimedia and other new features and also to keep the language both easily readable by humans and consistently understood by computers and devices such as web browsers, parsers, etc.
Who is this tutorial for
This tutorial is for anyone who wants to know what HTML5 is and have an interest in building Website or Web application.
Prerequisites
- Enthusiasm to learn HTML5
- Should have some experience of HTML and CSS
NOTE: Check the Getting taste of HTML and CSS tutorial to quickly experience about HTML and CSS.
What we are going to cover in this tutorial
- Introduction of HTML5 semantic elements
- Few regularly used HTML5 elements
-
header,main,nav,section,article,footer -
figure,videoandaudio
-
- Update our Student Portfolio website that we built in Getting the taste of HTML and CSS tutorial as per HTML5 elements
Website preview
Click here to preview the website.
| The website might look ugly in mobile. We will taste the responsive behavior in another tutorial. |
This tutorial has been designed to be fully hands-on.
| Follow the tutorial step by step to get maximum benefit. |
Let’s jump into the coding.
Step 0 : Starter
Code setup
Using Git and GitHub (Recommended)
- Make a project structure:
mkdir projects && cd projects[Optional] git clone https://github.com/brgtrainings/student-portfolio-html5cd student-portfolio-html5- Open
student-portfolio-html5folder in your favorite editor. - Open
index.htmlfile in the browser.
Using Zip
- Click to download the Starter Zip.
- Unzip
student-portfolio-html5.zip. - Rename
student-portfolio-html5-startertostudent-portfolio-html5. - Open
student-portfolio-html5folder in your favorite editor. - Open
index.htmlfile in the browser.
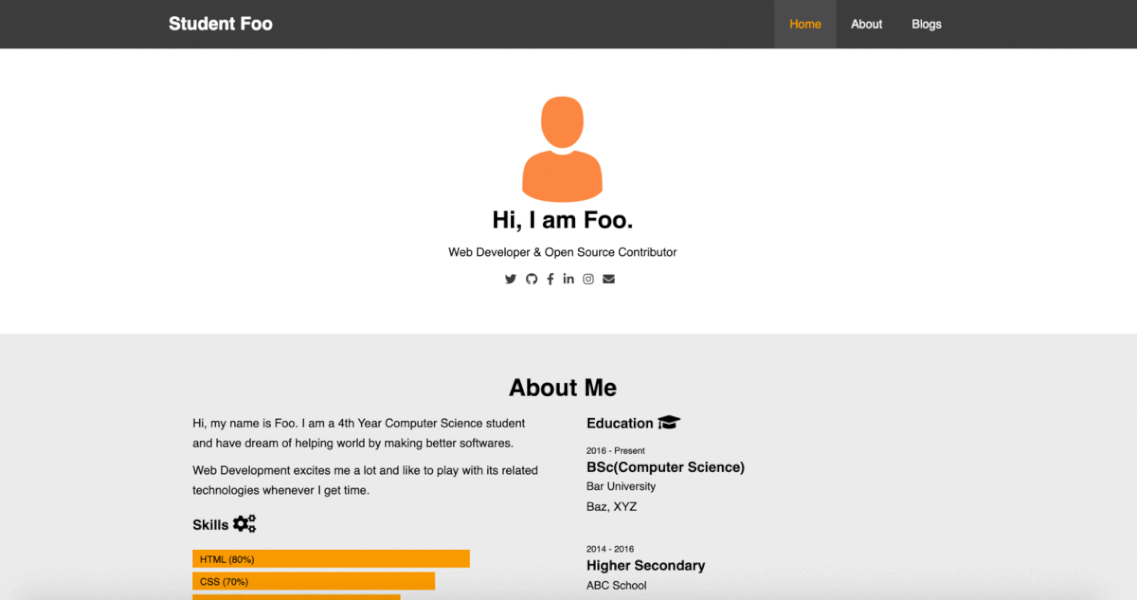
Preview
You should be able to see the following:
Step 1: Familiar with Semantic Elements
Semantic elements mean elements describing a meaning to the user.
For Examples: div and span are general elements and one can not get what these elements might describe.
While, HTML5 elements like section, header, main or article describes some meaning of the content.
A typical HTML5 structure looks like below:
<body>
  <!-- Navigation section -->
  <header>
    <nav>
      <ul>
        <li><a href="#">link</a></li>
        <li><a href="#">link</a></li>
        <li><a href="#">link</a></li>
      </ul>
    </nav>
    <h1>
      Page Title
    </h1>
  </header>

  <!-- Blogs section -->
  <section>
    <h2>
      My Blog Posts
    </h2>

    <article>
      <header>
        <p>
          Blog Title 1
        </p>
      </header>
      <p>
        Blog content 1
      </p>
    </article>

    <article>
      <header>
        <p>
          Blog Title 2
        </p>
      </header>
      <p>
        Blog content 2
      </p>
    </article>
    <aside>
      <p>
        Author info
      </p>
    </aside>
  </section>

  <section>
    <!-- ... other sections ... -->
  </section>

  <footer>
    Copyright Info
  </footer>
</body>
If you see index.html page of student-portfolio-html5 starter code in your editor, then you will notice that in most of the cases I have already followed the semantic layout except Blogs section.
Let’s update our Blogs section to make it semantic.
Update <div class="column"> with <article class="column">. The blogs section will look like as:
<section id="blogs" class="section-padding">
  <div class="container">
    <header>
      <h1 class="text-center">Blogs</h1>
    </header>
    <div class="blogs-content">
      <article class="column">
        <div class="card">
          <!-- Blog 1 content -->
        </div>
      </article>
      <article class="column">
        <div class="card">
          <!-- Blog 2 content -->
        </div>
      </article>
      <article class="column">
        <div class="card">
          <!-- Blog 3 content -->
        </div>
      </article>
    </div>
</section>
NOTE: Check the above step’s commit in GitHub.
| You will notice that the result is same in both cases. We just made the code more semantic by using HTML5. |
Step 2: Update image element
HTML5 provides figure element for representing self-contained content, potentially with an optional caption, for image, diagram, illustrations etc.
Let’s update our image in blog accordingly. Update our image tag img in all three blog as:
<figure>
  <img src="img/mentoring.jpg" alt="Mentoring">
  <figcaption>Image: <a href="https://unsplash.com">Unsplash.com</a></figcaption>
</figure>
NOTE: figcaption is used to define the caption of the figure.
And, add CSS for tag figcaption as:
figcaption {
  font-size: 12px;
  text-align: center;
}
NOTE: Check the above step’s commit in GitHub.
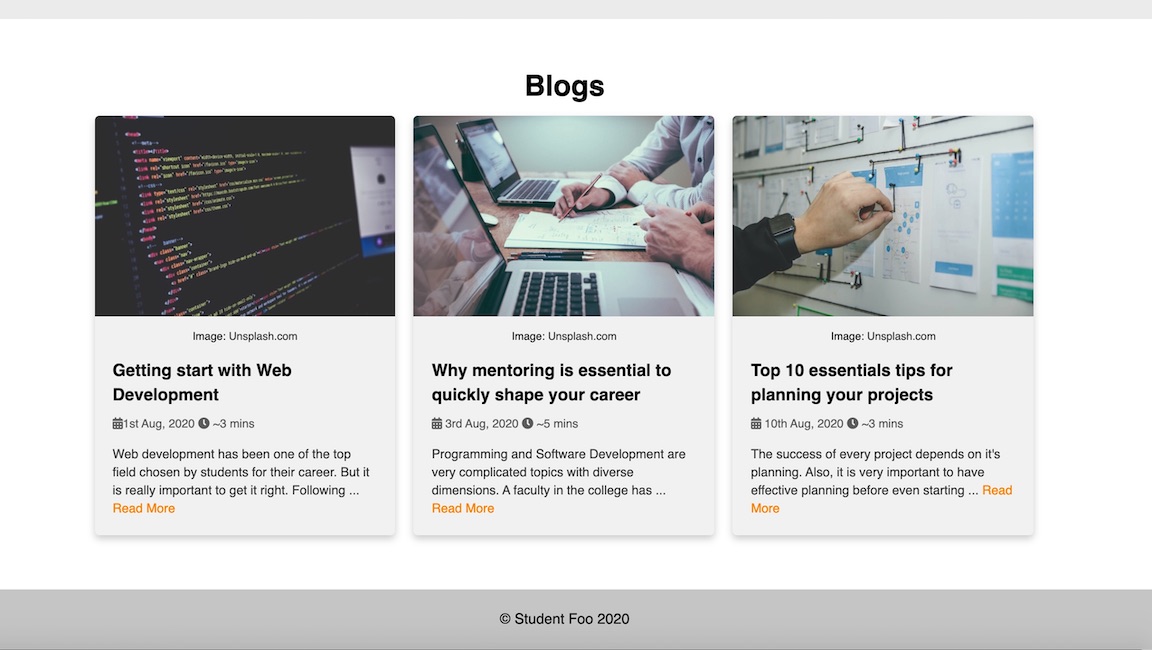
Blogs section now should look like below:
Step 3: Video and Audio elements
One of the major feature that added in HTML5 is the support for multimedia.
In this step we will add a new blog in our web page which will show video and audio features of HTML5.
Let’s create a blog entry as:
<article class="column">
  <div class="card">
    <figure>
      <img src="img/html5.png" alt="HTML5">
    </figure>
    <div class="blog-body">
      <h3 class="blog-title">Rise of HTML5, what are the features of HTML5?</h3>
      <div class="meta">
        <span><i class="fas fa-calendar-alt"></i> 26th Aug, 2020</span>
        <span><i class="fas fa-clock"></i> ~4 mins</span>
      </div>
      <p class="blog-text">
        HTML5 is a markup language used for structuring and presenting content on
        the World Wide Web. It is the fifth and the latest ...
        <a href="blogs/html5.html">Read More</a>
      </p>
    </div>
  </div>
</article>
IMAGE: Download the html5.png image from here
![]() .
.
We need to create another folder with name blogs and inside it let’s create a blog web page as html5.html.
Let’s use the simple blog layout as:
<section id="blog" class="section-padding">
  <div class="container">
    <header>
      <h1 class="text-center">Rise of HTML5, what are the features of HTML5?</h1>
    </header>
    <div class="blog-body">
      <div class="meta">
        <!-- same as blog entry in index.html -->
      </div>
      <hr>
      <div class="blog-text">
        <h2>Heading 1</h2>
        <p>
          <!-- paragraph content -->
        </p>

        <p>
          <!-- paragraph content -->
        </p>

        <h2>Heading 2</h2>
        <p>
          <!-- paragraph content -->
        </p>

        <!-- Other Heading and paragraphs -->
      </div>
    </div>
  </div>
</section>
And let’s style our blog page as:
/* Blog page */
#blog header h1 {
  font-size: 2rem;
  color: #333;
}
#blog hr {
  margin: 20px 0;
}
#blog .blog-body h2 {
  color: #444;
}
#blog .blog-body p {
  color: #555;
}
pre {
  border: 1px solid #ddd;
  background-color: #f1f1f1;
}
NOTE: Update the above new file html5.html as per the changes done in this GitHub’s commit.
You will notice that we can add video and audio in our web page as following:
<video controls width="400">
  <source src="some-video-source-url" type="video/webm">
    Sorry, your browser doesn't support embedded videos.
</video>

<audio controls src="some-audio-source-url">
  Your browser does not support the <code>audio</code> element.
</audio>
NOTE: The video extension is .webm but we can use other format like .mp4, .mov etc. Similarly, we can use other format for audio like .wav etc.
| Try to add your own Video and Audio files. |
Please check 'Where to go from here' section for HTML5 elements reference list.
Resources
Where to go from here
You can go through following useful links to continue your journey with HTML5 learning.
- Mozilla HTML5 Tutorial - Reference tutorial
Wishing you good luck for the learning journey ahead.
Thank You!

Help me to improve this tutorial.